LayerZero开发新手入门
在这个教程中,我们将使用 LayerZero 构建一个简单的跨链消息传输合约,并使用默认的 UA 配置。

一键发币: SUI | SOL | BNB | ETH | BASE | ARB | OP | POLYGON | 跨链桥/跨链兑换
LayerZero 是一种全链互操作性协议,旨在实现跨链的轻量级消息传递。LayerZero 提供真实且有保障的消息传递,具有可配置的免信任性。该协议被实现为一组节省 gas 且不可升级的智能合约。
在这个教程中,我们将使用 LayerZero 构建一个简单的跨链消息传输合约,并使用默认的 UA 配置。
本教程假设你对 Solidity Hardhat 有一定的了解,源代码可以从github下载。
1、创建 hardhat 项目
转到一个空文件夹,运行 npm init,然后按照其说明创建一个 npm 项目。项目准备就绪后,你应该运行 npm install --save-dev hardhat。
要创建 Hardhat 项目,请在项目文件夹中运行 npx hardhat:
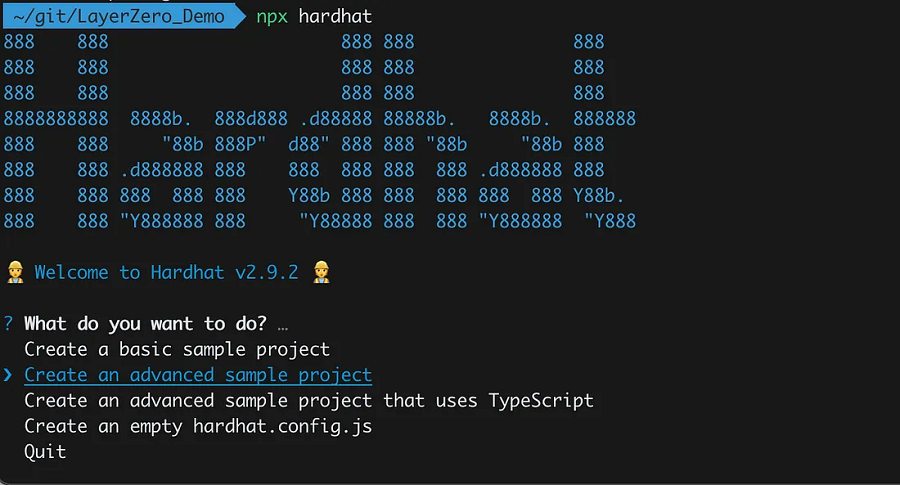
我们可以选择 Create an advanced sample project (创建高级示例项目)来为演示创建一个安全帽项目。
要发送跨链消息,合约将使用端点从源链 send() 并使用 lzReceive()在目标链上接收消息。为了使用它,我们需要从 LayerZero 存储库导入接口
2、创建合约
创建合约文件 LayerZeroDemo1.sol:
//SPDX-License-Identifier: MIT
pragma solidity ^0.8.9;
pragma abicoder v2;
import "../interfaces/ILayerZeroEndpoint.sol";
import "../interfaces/ILayerZeroReceiver.sol";
import "hardhat/console.sol";
contract LayerZeroDemo1 is ILayerZeroReceiver {
    event ReceiveMsg(
        uint16 _srcChainId,
        address _from,
        uint16 _count,
        bytes _payload
    );
    ILayerZeroEndpoint public endpoint;
    uint16 public messageCount;
    bytes public message;
    constructor(address _endpoint) {
        endpoint = ILayerZeroEndpoint(_endpoint);
    }
    function sendMsg(
        uint16 _dstChainId,
        bytes calldata _destination,
        bytes calldata payload
    ) public payable {
        endpoint.send{value: msg.value}(
            _dstChainId,
            _destination,
            payload,
            payable(msg.sender),
            address(this),
            bytes("")
        );
    }
    function lzReceive(
        uint16 _srcChainId,
        bytes memory _from,
        uint64,
        bytes memory _payload
    ) external override {
        require(msg.sender == address(endpoint));
        address from;
        assembly {
            from := mload(add(_from, 20))
        }
        if (
            keccak256(abi.encodePacked((_payload))) ==
            keccak256(abi.encodePacked((bytes10("ff"))))
        ) {
            endpoint.receivePayload(
                1,
                bytes(""),
                address(0x0),
                1,
                1,
                bytes("")
            );
        }
        message = _payload;
        messageCount += 1;
        emit ReceiveMsg(_srcChainId, from, messageCount, message);
    }
    // Endpoint.sol estimateFees() returns the fees for the message
    function estimateFees(
        uint16 _dstChainId,
        address _userApplication,
        bytes calldata _payload,
        bool _payInZRO,
        bytes calldata _adapterParams
    ) external view returns (uint256 nativeFee, uint256 zroFee) {
        return
            endpoint.estimateFees(
                _dstChainId,
                _userApplication,
                _payload,
                _payInZRO,
                _adapterParams
            );
    }
}
合约从源链向目标链发送消息,我们需要用端点地址构造它。并且需要两个接口: ILayerZeroEndpoint 和 ILayerZeroReceiver。
自定义函数 sendMsg 包装了 endpoint.send(...),这将导致在目标链上调用 lzReceive()。
在源链调用 endpoint.send(...)后,重载的函数 lzReceive 将自动在接收链上调用。
自定义函数 estimateFees包装了 endpoint.estimateFees(...),它将返回跨链消息的费用。
3、在不同的链上部署合约
为 Fantom 测试网创建部署脚本:
const hre = require("hardhat");
async function main() {
  const LayerZeroDemo1 = await hre.ethers.getContractFactory("LayerZeroDemo1");
  const layerZeroDemo1 = await LayerZeroDemo1.deploy(
    "0x7dcAD72640F835B0FA36EFD3D6d3ec902C7E5acf"
  );
  await layerZeroDemo1.deployed();
  console.log("layerZeroDemo1 deployed to:", layerZeroDemo1.address);
}
main().catch((error) => {
  console.error(error);
  process.exitCode = 1;
});
在 Fantom 测试网上部署合约:
npx hardhat run scripts/deploy_testnet.js --network testnet为Polygon Mubai测试网创建部署脚本:
const hre = require("hardhat");
async function main() {
  const LayerZeroDemo1 = await hre.ethers.getContractFactory("LayerZeroDemo1");
  const layerZeroDemo1 = await LayerZeroDemo1.deploy(
    "0xf69186dfBa60DdB133E91E9A4B5673624293d8F8"
  );
  await layerZeroDemo1.deployed();
  console.log("layerZeroDemo1 deployed to:", layerZeroDemo1.address);
}
main().catch((error) => {
  console.error(error);
  process.exitCode = 1;
});
在Mumbai测试网部署合约:
npx hardhat run scripts/deploy_mumbai.js --network mumbai成功部署两个合约后,我们得到了合约地址。本例中:
- Polygon Mumbai:
0x37587469690CC37EE19Ff6163ce7275BB1b17d3b - Fantom 测试网:
0xD67D01D6893cC4a2E17557765987d41E778fadca
4、测试
为Polygon Mumbai测试网创建一个 javascript 测试脚本:
const hre = require("hardhat");
const { ethers } = require("ethers");
async function main() {
  const LayerZeroDemo1 = await hre.ethers.getContractFactory("LayerZeroDemo1");
  const layerZeroDemo1 = await LayerZeroDemo1.attach(
    "0x37587469690CC37EE19Ff6163ce7275BB1b17d3b"
  );
  const count = await layerZeroDemo1.messageCount();
  const msg = await layerZeroDemo1.message();
  console.log(count);
  console.log(ethers.utils.toUtf8String(msg));
}
main().catch((error) => {
  console.error(error);
  process.exitCode = 1;
});
该脚本附加了我们在步骤 3 中部署的 0x37587469690CC37EE19Ff6163ce7275BB1b17d3b 的合约实例。它获取合约中的消息计数和最后一条消息,现在它将为 0 和空字符串。
使用 hardhat 运行脚本:
npx hardhat run scripts/demo1_mumbai.js --network mumbai
为 Fantom 测试网创建一个 javascript 测试脚本:
const { formatBytes32String } = require("ethers/lib/utils");
const { ethers } = require("ethers");
const hre = require("hardhat");
async function main() {
const LayerZeroDemo1 = await hre.ethers.getContractFactory("LayerZeroDemo1");
const layerZeroDemo1 = await LayerZeroDemo1.attach(
"0xD67D01D6893cC4a2E17557765987d41E778fadca"
);
const fees = await layerZeroDemo1.estimateFees(
10009,
"0x37587469690CC37EE19Ff6163ce7275BB1b17d3b",
formatBytes32String("Hello LayerZero"),
false,
[]
);
console.log(ethers.utils.formatEther(fees[0].toString()));
await layerZeroDemo1.sendMsg(
10009,
"0x37587469690CC37EE19Ff6163ce7275BB1b17d3b",
formatBytes32String("Hello LayerZero"),
{ value: ethers.utils.parseEther("1") }
);
}
main().catch((error) => {
console.error(error);
process.exitCode = 1;
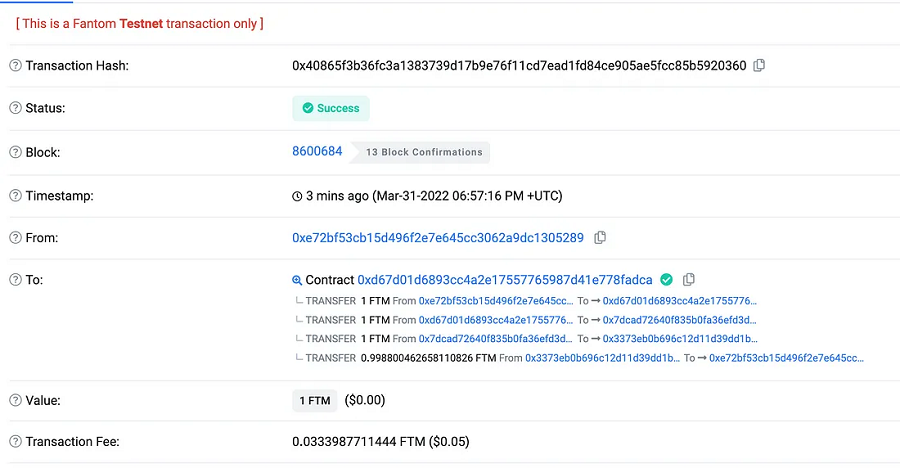
});Fantom 测试网测试脚本附加地址 0xD67D01D6893cC4a2E17557765987d41E778fadca。它将从 Fantom 测试网向Mumbai上的 0x37587469690CC37EE19Ff6163ce7275BB1b17d3b 合约发送一条消息“Hello LayerZero”,并将获取用于演示目的的估算费用。最后,它将发送带有费用的消息,为简单起见,发送值为 1FTM。如果源交易比传递的值便宜,它将把额外的金额退还到我们传递的 _refundAddress 地址。
使用 hardhat 运行脚本:
npx hardhat run scripts/demo1_testnet.js --network testnet脚本运行完成后,我们可以在 FTMScan 测试网中搜索交易, LayerZero 合约端点 0xd67d01d6893cc4a2e17557765987d41e778fadca。
再次运行Mumbai测试脚本,控制台会打印:

任务完成,Mumbai的合约收到了 Fantom 测试网发来的消息,并增加了计数器。 LayerZero 让整个过程变得非常简单。
原文链接:LayerZero Tutorial for Beginners
DefiPlot翻译整理,转载请标明出处
免责声明:本站资源仅用于学习目的,也不应被视为投资建议,读者在采取任何行动之前应自行研究并对自己的决定承担全部责任。